Battery switch on travel trailer function is crucial for managing your RV’s power. Understanding how to use your battery switch correctly ensures reliable power for your appliances and prevents costly battery damage. This guide covers everything from the different types of switches available to troubleshooting common problems and implementing essential safety precautions. Whether you’re a seasoned RVer or a first-timer, mastering your battery switch is key to a smooth and enjoyable travel experience.
We’ll explore the various types of battery switches—single, dual, and three-way—and delve into their specific applications. You’ll learn how to properly wire and maintain your switch, maximizing your battery life and minimizing the risk of electrical issues. We’ll also cover essential safety procedures to protect yourself and your equipment while working with your RV’s electrical system.
Understanding Battery Switch Functionality in Travel Trailers
Your travel trailer’s battery switch is a crucial component, acting as the central control for your trailer’s battery power. Understanding its function and proper operation is key to ensuring a smooth and enjoyable camping experience. This section will cover the different types of switches, typical wiring configurations, operation procedures, and maintenance best practices.
Types of Battery Switches Used in Travel Trailers
Travel trailers utilize several types of battery switches to manage power flow. The most common are single-pole, double-throw (SPDT) switches, which allow you to select between battery power or shore power, and dual battery switches, enabling the use of two batteries (typically one for house functions and one for starting the vehicle). Some more advanced systems incorporate automatic switching capabilities or remote control options.
Understanding the type of switch in your RV is the first step to proper use and maintenance.
Typical Wiring Diagrams for a Battery Switch System
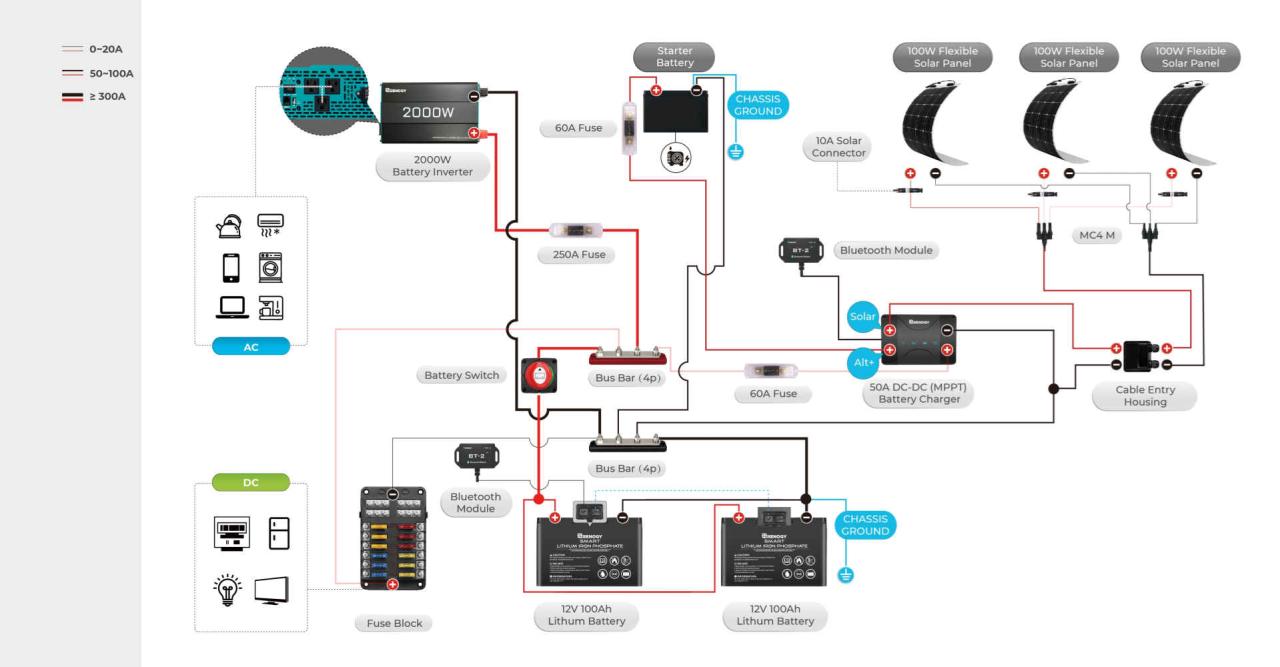
A typical single-battery system involves a simple circuit: the battery connects to the switch, and the switch then connects to the trailer’s 12-volt system. This system allows you to isolate the battery from the trailer’s electrical system when not in use. A dual-battery system will have two battery terminals connected to the switch, which then distributes power to the trailer’s various systems.
Each battery may have its own dedicated circuit breaker or fuse for protection. A visual representation of this would show a battery symbol connected to a switch symbol, with multiple outgoing lines representing the trailer’s circuits. The switch itself would have multiple positions: “Off,” “Battery,” and potentially “Both” or “Shore.” These diagrams often use standard electrical symbols to represent components.
Complex systems might involve additional components like a battery charger or inverter.
So, you’re an audiophile who loves to travel? Awesome! Make sure you check out this guide on setting up your audiophile travel setup before you go; it’s a lifesaver for keeping your tunes crisp on the road. And while you’re planning, don’t forget travel insurance! Protecting your trip with Aon travel insurance gives you peace of mind, letting you focus on enjoying your amazing music and vacation.
Operating a Battery Switch
Operating your battery switch is straightforward, but safety precautions are vital. Before working with any electrical components, always disconnect the negative terminal of your battery to prevent accidental shorts or shocks. The switch itself typically has clearly marked positions, usually “Off,” “Battery,” and possibly “Both” or “Shore.” “Off” completely disconnects the battery. “Battery” allows power from the trailer battery to the system.
“Both” (if applicable) combines battery and shore power, and “Shore” runs the system solely on external power. Always consult your trailer’s manual for the specific operation instructions and position labels. Moving the switch lever to the desired position should be smooth and firm. Never force the switch.
Maintaining a Travel Trailer’s Battery Switch
Regular maintenance is essential for the longevity and safe operation of your battery switch. Visually inspect the switch periodically for any signs of corrosion, loose connections, or damage. Clean any corrosion with a wire brush and apply a corrosion inhibitor if necessary. Tighten any loose connections. If you notice any unusual behavior, such as sparking or overheating, immediately consult a qualified RV technician.
Properly cleaning and maintaining the switch will ensure its smooth and safe operation. Remember to disconnect the negative battery terminal before performing any maintenance.
Troubleshooting Common Battery Switch Issues

Your travel trailer’s battery switch is a critical component, ensuring you have power when you need it. Problems with this switch can leave you stranded without lights, refrigeration, or other essential systems. Understanding how to troubleshoot these issues is vital for a smooth camping experience.
A methodical approach is key to efficiently diagnosing and fixing battery switch problems. This involves checking connections, inspecting the switch itself, and testing the battery system. Often, the solution is simple, but knowing where to start is half the battle.
Troubleshooting Flowchart
The following flowchart provides a step-by-step guide to diagnosing battery switch issues. Following this sequence will help you isolate the problem quickly and efficiently.
Start: Is the battery switch in the correct position (e.g., “Both,” “Battery 1,” “Battery 2,” “Off”)?
Yes: Proceed to check connections and the switch itself.
No: Ensure the switch is correctly positioned. If the problem persists, move to the next step.
Check Connections: Are all connections clean and tight? Look for corrosion or loose wires.
Yes: If connections are good, proceed to check the switch.
No: Clean and tighten connections. If the problem persists, move to the next step.
So, you’re an audiophile who loves to travel? Awesome! Make sure you check out this guide on setting up your audiophile travel setup before your next trip – it’s seriously game-changing for your in-flight entertainment. And speaking of travel prep, don’t forget to sort out your insurance! Getting Aon travel insurance is a smart move, offering peace of mind so you can focus on enjoying your amazing music and your amazing vacation.
Check the Switch: Does the switch feel sturdy and operate smoothly? Is there any visible damage?
Yes: Test the battery system. If the problem persists, the battery or other system components might be at fault.
No: The switch may need repair or replacement.
Test Battery System: Are the batteries charged? Is there voltage at the terminals?
Yes: The issue is likely with another component in the system.
No: Check the batteries and their charging system.
Common Causes of Battery Switch Malfunctions
Several factors can contribute to battery switch malfunctions. Identifying the root cause is crucial for effective repair. This section Artikels common issues and their potential solutions.
- Corrosion: Corrosion on battery terminals and switch connections is a frequent culprit. This build-up of oxides prevents proper electrical contact.
- Loose Connections: Vibrations during travel can loosen connections, leading to intermittent or complete power loss.
- Faulty Switch: The switch itself can fail due to wear and tear, internal damage, or exposure to the elements.
Resolving Common Battery Switch Problems
Addressing these problems typically involves straightforward steps. However, always remember to disconnect the battery negative terminal before performing any maintenance or repair to prevent accidental shocks.
- Clean Connections: Use a wire brush and baking soda solution to thoroughly clean battery terminals and switch connections. Apply a dielectric grease to prevent future corrosion.
- Tighten Connections: Ensure all connections are securely fastened. Use appropriately sized wrenches to avoid damaging terminals.
- Replace the Switch: If the switch is faulty, replace it with a compatible model. Consult your trailer’s manual for specifications.
Essential Tools for Battery Switch Maintenance and Repair, Battery switch on travel trailer function
Having the right tools on hand makes battery switch maintenance and repair easier and safer. This list covers the essentials for most situations.
- Wire brush
- Wrench set (metric and standard)
- Baking soda
- Water
- Dielectric grease
- Voltmeter (optional, but helpful for testing)
- Replacement battery switch (if needed)
Battery Switch and Power Management in Travel Trailers
Your travel trailer’s battery switch is the central nervous system of your power system, controlling the flow of electricity between your batteries and various appliances. Understanding how it interacts with other components is key to efficient and reliable power management. This section details the interplay between the battery switch and other electrical systems, impact on battery health, and strategies for maximizing battery lifespan.
The battery switch acts as a gatekeeper, selectively routing power from either your house batteries (powering interior lights, appliances, etc.) or your chassis battery (powering engine starting and some accessories), or both. It works in conjunction with several key components. The inverter converts DC power from your batteries into AC power for items like laptops and microwaves. The converter does the opposite, transforming AC power from a campground hookup into DC power to charge your batteries and run 12-volt appliances.
Solar panels provide a renewable source of DC power that usually charges the house batteries, often through a charge controller which regulates the flow of solar power to prevent overcharging. The battery switch allows you to choose which battery bank is powering these components or to combine both banks.
Battery Switch Impact on Battery Life and Performance
Improper use of the battery switch can significantly impact battery life and performance. Continuously switching between batteries or leaving the switch in a position that allows for excessive discharge can lead to premature battery failure. For example, leaving the switch in the “both” position while not connected to shore power will quickly drain both batteries, especially if you have energy-intensive appliances running.
Conversely, leaving the switch in the “off” position when you need power for essential systems will leave you stranded. Consistent deep discharges and improper charging cycles degrade battery capacity and lifespan significantly faster than optimal usage.
Strategies for Maximizing Battery Life Through Efficient Battery Switch Operation
Several strategies can extend the life of your RV batteries. Understanding and consistently applying these methods is crucial for maximizing their lifespan and minimizing unexpected power outages.
- Regularly inspect and clean battery terminals: Corrosion can significantly impede the flow of electricity, reducing battery performance and life. Clean terminals with a wire brush and baking soda solution.
- Avoid deep discharges: Deep discharges severely stress batteries. Monitor your battery levels regularly using a voltmeter and disconnect non-essential loads to prevent this. Consider adding a battery monitor to assist with this.
- Use the switch strategically: Only turn on the necessary circuits. For example, if you’re just using interior lighting, don’t leave the switch in the “both” position unless charging.
- Utilize shore power or solar when available: Hooking up to shore power or using solar panels will help keep your batteries charged and reduce reliance on their power. This minimizes deep discharges and prolongs their lifespan.
- Proper charging: Always charge your batteries correctly using a suitable charger. Overcharging or undercharging will shorten their lifespan.
Proper Procedure for Switching Between House and Chassis Batteries
Switching between your house and chassis batteries depends on your specific battery switch design. However, most switches feature positions for “Off,” “House,” “Chassis,” and “Both.” Always consult your RV’s manual for the exact operation of your battery switch. Generally, you should follow these steps:
- Turn off all unnecessary appliances and loads before changing the switch position to prevent electrical surges or damage.
- Identify the positions on your battery switch corresponding to your house and chassis batteries.
- Carefully move the switch to the desired position (“House,” “Chassis,” or “Both”).
- Verify power is available at the intended circuits after switching.
Battery Switch Installation and Replacement: Battery Switch On Travel Trailer Function
Installing a new battery switch in your travel trailer is a straightforward process, but requires careful attention to detail to ensure safe and reliable operation. Choosing the right switch and wiring it correctly is crucial for preventing electrical issues and protecting your investment. This section details the steps involved, considerations for selection, and tips for a successful installation.
Selecting the Correct Battery Switch
The size and type of battery switch you need depend on the amperage of your battery bank and the overall electrical system in your travel trailer. Oversized switches are generally preferable to undersized ones, providing a greater margin of safety. Consider the total amperage draw of all appliances and devices connected to your battery system. For example, a trailer with a 100-amp hour battery bank might require a 100-amp or even a higher-rated switch to handle potential surge currents.
Different types of switches exist, including manual, automatic, and those with built-in circuit breakers or other safety features. A switch with an integrated circuit breaker offers additional protection against overloads. Always check the manufacturer’s specifications to ensure compatibility and safety.
Step-by-Step Installation Process
Before beginning, always disconnect the negative terminal of your battery to prevent accidental shocks. This is a crucial safety precaution.
- Identify the location: Choose a readily accessible location for the switch, ideally near your battery bank but protected from the elements.
- Prepare the mounting area: Ensure the mounting surface is clean, dry, and stable. Drill any necessary mounting holes, following the switch manufacturer’s instructions.
- Mount the switch: Securely mount the switch using the appropriate hardware. Ensure a tight and stable fit to prevent vibration-related issues.
- Connect the positive battery cable: Connect one end of a heavy-gauge wire (rated for the switch’s amperage) to the positive terminal of your battery. The other end connects to the “battery” or “in” terminal on the switch.
- Connect the load side: Connect another heavy-gauge wire from the “load” or “out” terminal of the switch to the positive bus bar or distribution point for your trailer’s electrical system. This wire should also be appropriately sized for the amperage.
- Connect the ground: Ensure a solid ground connection between your battery’s negative terminal and the trailer’s chassis. This is vital for proper circuit completion and safety.
- Test the installation: Carefully reconnect the negative battery terminal and test the switch to ensure all circuits are functioning correctly. Check all connected appliances and lights to confirm functionality.
Ensuring a Secure and Reliable Installation
Using appropriately sized wiring is critical. Undersized wiring can overheat and create a fire hazard. Properly crimp all wire connections to prevent loose connections, which can cause voltage drops and intermittent power failures. Use heat-shrink tubing or other insulating materials to protect wire connections from moisture and abrasion. Apply a dielectric grease to all battery terminals and connections to prevent corrosion.
Finally, double-check all connections before reconnecting the battery’s negative terminal.
Wiring the Battery Switch
The wiring diagram provided by the battery switch manufacturer should be followed meticulously. Typically, the positive cable from the battery connects to the “battery” or “in” terminal of the switch. The positive cable leading to the trailer’s electrical system connects to the “load” or “out” terminal. The ground connection is separate and should be connected directly to the chassis or a designated ground point.
Always use appropriately sized and rated wire for all connections, matching the amperage of the switch and the load it will carry. Incorrect wiring can lead to malfunctions, damage to components, or even fire.
Mastering your travel trailer’s battery switch is about more than just turning it on and off; it’s about understanding your RV’s electrical system and ensuring safe, reliable power. By following the guidelines and safety precautions Artikeld here, you can confidently manage your power, extend your battery life, and enjoy worry-free adventures on the road. Remember to always prioritize safety and consult a professional if you encounter any issues you can’t resolve yourself.
Happy travels!
Answers to Common Questions
What happens if I leave my battery switch on all the time?
Leaving your battery switch on constantly can drain your batteries, especially if you have parasitic draws (small appliances drawing power even when off). It’s best to turn it off when not using the RV for extended periods.
How often should I check my battery switch connections for corrosion?
Inspect your battery switch connections at least twice a year, or more frequently if you travel in harsh environments. Corrosion can significantly reduce power and lead to malfunctions.
Can I use a different type of battery switch than what came with my trailer?
Potentially, but it depends on your trailer’s electrical system and amperage requirements. It’s best to consult a professional or your trailer’s manual before making any changes.
My battery switch is making a clicking sound. What could be wrong?
A clicking sound often indicates a loose connection, a faulty switch, or a low battery voltage. Check connections first; if the problem persists, replace the switch.
